updated 2019-11-20
How To copy and share files between Fedora computers and share a printer
How to set up a home network on Fedora (or Ubuntu) with a router.
(At the begining of this article, I was still using Fedora 11, 13, and 14 on different pc’s and had live copies of Ubuntu 8.4, 9.4, 9.10, and 10.10 that I had looked at). Since then, I have bought new pc’s and kept up with Fedora in 2019 I was on 27 and now have 24, 27, and 30 on different machines.
(hint: In any version of Linux, the task is to find your individual IP’s; they have already been assigned by the router.)
Fedora and Ubuntu are the 2 most popular Unix/Linux desktop distributions. see DistroWatch.com
You can use each of your 2 (or more) computers (running Fedora and, or, Ubuntu), as a backup for the other, to eliminate backups to DVDs/CDs (which are a hassle), and to print from any computer to your 1 printer (or any of your printers)
Note: When I got a 2nd computer, a laptop with a wireless NIC (Network Interface Card) already built-in, I immediately bought a wireless router for it, and I am writing this primarily for the Fedora (and Ubuntu) users who have also acquired a 2nd computer and a router. (because I only know Fedora (and checked Ubuntu). Other Linux systems may be different. If you can confirm it the same on Suse, Mandriva, or etc., leave a comment below telling us) If you have 2 computers and no router, you should get one. (see My New Router) To get started, all you need to do is to find your (router assigned) IP’s. (Using Windows, open a command prompt and get the IP address by typing ipconfig)
My New Router Oct. 2011;
My belkin router has a “security log” page and my new 2wire router (at&t uverse) has a “settings >> logs >> event log” page. the belkin showed incoming ip addresses “unknown, stopped” and now the 2wire shows incoming ip addresses “unknown, stopped”. I looked up a few and they were from China. … gov. sponsored hackers! – GregMy New Router
July, 2009; By Michael HorowitzJust that morning, I had installed a new router on my LAN so I checked the activity log in my new router After only 1 day of operation, my router had blocked five unsolicited inbound connection attempts, from three different IP addresses, and they were all in China!
A router protects a computer from just these types of attacks. Everyone should do their computing behind a router. You can test how well the firewall in your router is protecting you with Steve Gibson’s Shields Up!: [https://www.grc.com/x/ne.dll?bh0bkyd2]
see Michael’s full article “Help! Chinese Hackers are Attacking my PC” at
http://itmanagement.earthweb.com/secu/article.php/3829211/
Step 1
Find your computers IP’s
All you need is to see your IP addresses already assigned to your Fedora (Ubuntu, all?) computers by your router. Go to your network icon in the upper right corner (the default) of your desktop; click on it; and select
“wired connection” (unless you are lucky-farsighted enough to have a laptop with a wireless modem that works with linux. [ Realtek is NOT supported ] Intel’s may be the only ones that ARE supported: AC-9560 [or 9260] – try a fedora or whatever live install chip in a store to find out if the wireless modem will be recognized.
After selecting “wired connection”, select “network” or “wired” settings. There you will see your LAN IP address: 192.168. x . x

Notice that the “Primary DNS” ends with 1, and is the router. This is fairly common for all routers. Linksys routers, for example, use 192.168.1.1 for their internal IP address. D-Link and Netgear routers typically use 192.168.0.1. In any case you can see yours in your listing and write it down also, if you did not already know.
Look at yours and see what each one is.
Look at, write down, all your addresses. They are what you need to start backing up, copying, your files across your computers.
When you got your router, and learned all about it, did you give your network, LAN, a name? (and your “SSID”?) You should now if you did not then. Some people do, and when you click on your wireless networking icon, you see the names of all your neighbors wireless networks also (their SSID’s). [NETGEAR, 2WIRE706, 2WIRE806, stewie, sailfish1, hwktech, Rezende, … ] (The SSID is the equivalent to the wireless network’s name, but is only “for show” – what others see.)
The IP address of your router is also what you put in your browser as if it were a web site address and get to the router menu where you can see, set, or change things, including your network, LAN, name. (mine was under “LAN Setup” and the SSID was under Wireless, Channel and SSID) I made my LAN name TheSmiths and my SSID The-Smiths only so that I could tell them apart.
It has been a few months now, since I first discovered my IP addresses and in that time 2 of my 3 pc’s (the 2 least used) have been been given a different IP address by the router and then, days or weeks later, one reverted back again. Just now, the second one reverted back, and again, I got this message when I tried to log across to it, still using its old address (because I did not know it had changed):
@@@@@@@@@@@@@@@@@@@@@@@@@@@@@@@@@@@@@@@@@@@@@@@@@@@@@@@@@@@
@    WARNING: REMOTE HOST IDENTIFICATION HAS CHANGED!     @
@@@@@@@@@@@@@@@@@@@@@@@@@@@@@@@@@@@@@@@@@@@@@@@@@@@@@@@@@@@
IT IS POSSIBLE THAT SOMEONE IS DOING SOMETHING NASTY!
Someone could be eavesdropping on you right now (man-in-the-middle attack)!
It is also possible that the RSA host key has just been changed.
The fingerprint for the RSA key sent by the remote host is
a6:f2:ef:5f:f3:e6:b2:43:2f:ee:63:dc:9b:94:57:75.
Please contact your system administrator.
Add correct host key in /home/greg/.ssh/known_hosts to get rid of this message.
Offending key in /home/greg/.ssh/known_hosts:2
RSA host key for 192.168.2.3 has changed and you have requested strict checking.
Host key verification failed.
rsync: connection unexpectedly closed (0 bytes received so far) [Receiver]
rsync error: unexplained error (code 255) at io.c(601) [Receiver=3.0.7]
last time I found by my attempts, that the quickest way to “fix” it, (there is nothing “nasty” happening … except that my router has changed its IP address assignment for my old-Dell back to its original “~.2.3”), is to clear my .ssh/known_hosts file with a “cd .ssh” and an “echo > known_hosts” command in a terminal window.
If you have several entries from several different computers and don’t want to clear them all, since it is a text file, you can use a text editor (not a word processor!) to delete the line starting with 192.168.2.3, or whichever computer address was changed.
I have backed up both my computers to the old Dell several times and copied photos back and forth quite a few times. We are both printing to our 1 “network” printer directly, no switching of cables or passing around flash chips of files to print. In short, life is better already. The time will come to find out how to make the, dynamically router assigned, IP addresses fixed and permanent. After you have accomplished steps 1 through 5, you, also, may come back later to do step 6 … and go to my post on “How To eliminate the SSH password prompt and run remote scripts”
– Greg, Jan 15, 2011
In Jan. of 2012, I finally made my IP addresses permanent, step 6. – Greg
Step 2
How to backup your Fedora (or Ubuntu)
computers to each other
How to backup to another Linux computer
Create a folder for your “remote” backups
Create a folder on your “target” pc where you want to put your first backup – of everything on and under your desktop. (use Nautilus, like windoze-explorer, or a command line, whichever is more familiar to you)
On that target Desktop, you have a “home folder” (right under “Places” top-Left corner of your desktop — /home/[user]/ is on all Linux/Unix computers). It can be a good place to create your new folder, ‘you-backups’(or, my-HP-backups … use your name on the computer or the name of the computer), for your backups from your computer.
The path is now /home/[user]/you-backups/ or /home/[user]/my-HP-backups/ or whatever. You are putting your backups (from your HP) on [user]’s computer in this example. (Don’t use an apostrophe in the folder name. That is (has been) “illegal” and will cause you problems with your backups – it is not worth the hassle.)
Note, it is FINE if you are the [user] on both computers, but, if so, name the backups folder to identify your computer that the data comes from.
Do your first backup
on your computer execute command #1. from a terminal window
(Applications -> System Tools -> Terminal)
[put] copy your Desktop, from your /greg/ computer to “joe’s” (~.2)
1. rsync -avz -e ssh /home/greg/Desktop root@192.168.2.2:/home/joe/gregs-backups/
Now that you have backed up your desktop folder, and everything under it, do you have things in Documents, Music, and Pictures folders? You back up them and all the others the same way:
rsync -avz -e ssh /home/greg/Documents root@192.168.2.2:/home/joe/gregs-backups/
rsync -avz -e ssh /home/greg/Music root@192.168.2.2:/home/joe/gregs-backups/
rsync -avz -e ssh /home/greg/Pictures root@192.168.2.2:/home/joe/gregs-backups/
(read about the rsync command – it is much faster than FTP and other methods, and only copies the files that have changed)
[get] Still on my own computer, I can also copy Desktop files from joe’s computer to mine
2. rsync -avz -e ssh root@192.168.2.2:/home/joe/Desktop /home/greg/joes-backups/
And, just as above, I can repeat the command for all his other folders: Documents, Music, Pictures, etc. Just change joe/Desktop to joe/Documents … etc.
in both of these examples, the folders “gregs-backups” and “joes-backups” have already been created, but the “Desktop” folder which is to be copied/updated (along with all its contents), will be either created or updated as necessary, by the backup command, rsync.
You can bring up a terminal window and execute the command (to log across)
ssh you@192.168.2.2where “you” is the user on the computer (~.2)(192.168.2.2) and give it (when prompted) the “you” password.
Also, doing it for the first time, you will get a warning that it is an unknown computer and when you go ahead and login, it will say
Permanently added ‘192.168.2.2‘ (RSA) to the list of known hosts.
which is good. Sooner or later, we will want to use “openSSH” to execute scripts without having to answer password prompts all the time. (see my article on “How To eliminate the SSH password prompt and run remote scripts“) While there, “cd” around and explore, even “su -” and login as root on your (~.2) computer and explore that.Of course, on your Linux desktop, I am sure you already know how easy it is to mount and copy (“drag and drop”) entire folders and files from your Windows partition into Linux folders (pictures and Word documents, etc.)
files we both use, share
Additionally,
/home/us/Pictures/our-cameras
is one exception. Whenever I upload pictures from my camera (or hers) to my computer, or edit one, I also copy them (it) over to her computer from down in my folder our-cameras/
rsync -avz -e ssh * root@192.168.2.2:/home/her/Pictures/our-cameras/
When ever she works on a photo … makes a smaller copy of one or … whatever, or uploads pictures from her camera, she will copy the new image(s) to my computer, keeping them in sync, (rsync)
For her to send her pictures to me, she just clicks on an icon (in her folder our-cameras/ ) that contains the one line script
rsync -avz -e ssh * root@192.168.2.4:/home/greg/Pictures/our-cameras/
(where ~.4 is my computer) and that’s it. (she doesn’t even need to give it the password with “openSSH” – mentioned above)
Note: Make a (“script”) file executable with “chmod 755 filename” then call it from a command line with ./filename – or double click it’s icon.
After getting your backup commands in a file, the next step, if you wish – and when you are ready, is to automate it. Suppose we have it do our backup once a day, every day. Lets say we will always have the old server up (It is the best place to have the printer connected – unless you can plug it into your router) and whenever a laptop is up, it will be backed up within 5 minutes (for example) of connecting: We can have a crontab entry to run a script every 5 minutes or whatever and that script would check if either backup has been done yet that day, and if one has not then, check if the laptop is connected and if so, call its script. See my article “How To eliminate the SSH password prompt and run remote scripts” for an idea for a script. (it is in the category “Networking”)
Step 3
Make sure your software firewall is off
“if you have a hardware firewall [a router], don’t bother with a software firewall” “… And don’t get me going about all the times when my software firewall prevented me from using a shared folder or a networked printer… arrgh!” – a security guru, Bob Rankin

On all your computers,
on fedora 15,16,17,18 “Firewall” go to Applications >> Show All >> Firewall
“Firestarter” ??!! (enough U.9.4 !)
Enter the root password to get authority to turn it off.
If it is on, turn it off and apply the change. … and answer “Yes”, of course, to “Are you sure you want to do this”
- Note: This is Linux, not Microsloth Windoze. If you take your laptop out and use the wifi in a coffee shop and boot up under windoze there, you should turn on your windoze software firewall while in the coffee shop.
Step 4
How to access your printer from another Fedora or Ubuntu computer

First, easiest, method: To use your printer on other Linux computers, on your home network, just flag it as “published” on the computer where you have it connected:
0. Just verify that it is already marked as “shared” (make sure).
Go to your desktop menu:
Applications >> Other >> Printing on Fedora “Mate”
or go to a root command line and run:# system-config-printer
then right-click on the printer icon.
(see image on the right)
That’s all, just verify.
If it isn’t checked, check it.
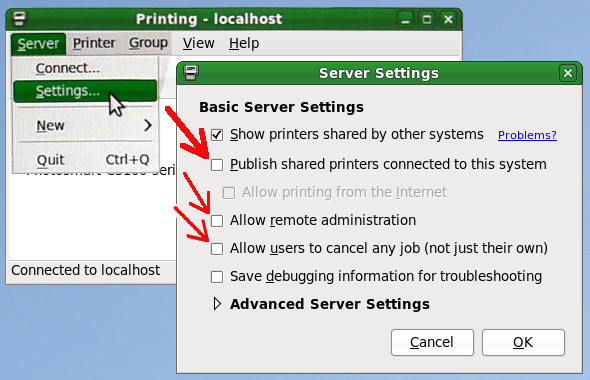
1. still at System –> Administration –> Printing
click server -> settings (give root password)
Check “Publish shared printers …” and any others you want, to control it from anywhere … I checked 3 of them here … but, I don’t have any small children around. …(?)
As soon as you click “OK”, your printer will immediately show up on your other computers.
Next, you will be prompted for “Authentication” to “read and modify firewall settings” just click cancel.
When a printer is “Published”, you will see it everywhere. You don’t need to go “looking for it” with IP’s and etc.
(note: this is the CUPS printer “Server Settings” menu)
By default every printer is “shared” and by default, every (Fedora and Ubuntu?) computer will show any printer that is “Published” as we have just done. So, this is it. You are done. Your printer will now show up on all your other (Linux) computers as well as the one here that it is directly connected to.
(After checking “Publish shared printers ….” I was prompted for the root password again “to allow changing firewall settings”. I have the firewall off and it should stay that way. I hit “cancel”. I checked and my new printer settings are still saved. Don’t let the system mess with things it shouldn’t. In ubuntu, it said “you may need to adjust the firewall to allow network printing to this computer.” – yeah, like Turn the firewalls off – if you haven’t already. It also said select System –> Administration –> Firewall – but, “firewall” is not one of Ubuntu 8.4 Live’s options)
I don’t yet know what that “Allow printing from the internet” is all about, I can print internet pages just fine without it.
Note: as long as the printer is attached directly to one of your computers, talk about printer IP’s is not relevant. An IP address for your printer is not needed, and a display of IP = 0.0.0.0, which is not a valid IP address, confirms that. “0.0.0.0” means that it is not set; that “it’s not getting an address from anywhere”.
Alternate Step 4
connecting your printer directly to your router with a cat5 cable
If you have an ethernet socket in the back of your printer, along with the USB socket that you have been using, you could plug it directly into your router, but I tried it and it did not work “right off the bat” and so I decided that what we have just done is the “accepted” method, streamlined to make it very easy, as we just saw. … “maybe later.”
Step 5
Giving your computers Names
This will make finding computers, printers, and everything else, easier. To save a hassle later and make things easier from the start. It is very easy if you just know where to do it.
To see your computer’s name
$ hostname or
$ hostname -f to see the full name, computer name and network (domain) name. You may have to go to your router’s set up to see your domain name if that is where you set it.
The Fedora installation setup prompts you to supply a host name for your computer –  and mentions identifying the computer on a network.
In other words, if you have more than one computer, or think you might be getting a 2nd computer, Change it “localhost.localdomain” to your name Joe or Harry or My-Laptop or … something simple, and unique; … because 2 pc’s cannot communicate with the same (host) name. The Domain name, is the name of your network, your LAN, and you set it in your (wireless?) router when you got it. It is fine.
To change your computer’s name
Valid Hostnames
You may give your computer any name provided that the full hostname is unique. The hostname may only include letters, numbers and hyphens.
To change the computer’s name, log in as root and edit /etc/sysconfig/network and change “localhost.localdomain” to something simple that identifies that computer
example /etc/sysconfig/network
from
 NETWORKING=yes

       HOSTNAME=localhost.localdomain
to
 NETWORKING=yes

       HOSTNAME=[your-new-name]
and if your /etc/hosts file looks like this, change it
from
127.0.0.1       localhost.localdomain    localhost

      ::1     localhost6.localdomain6    localhost6
to
127.0.0.1       localhost.localdomain    [your-new-name]

      ::1     localhost6.localdomain6    localhost6
Note:
docs.FedoraProject.org says
Many networks [routers] have a Dynamic Host Configuration Protocol (DHCP) service that automatically supplies connected systems with a domain name. To allow the DHCP service to assign the domain name to this machine, specify the short host name only. (your computer name)” [Right, “Joe” or “Harry” or “Mary” or “My-Laptop” or “My-Acer” … whatever.]
DHCP Server Implementations
Today, many routers include DHCP functionality – to act as a DHCP server allows clients that connect to the router to be automatically assigned IP addresses. This provides numerous potential advantages in an environment where a limited number of public IP addresses is shared amongst multiple clients, or where IP Network Address Translation (NAT) is used to dynamically share a small number of addresses. Since DHCP requires a database, a router that acts as a DHCP server requires some form of permanent storage. This is often implemented using flash memory on routers, while “true” servers of course use hard disk storage.
My Router
DHCP Server
The DHCP server function makes setting up a network very easy by assigning IP addresses to each computer on the network. The DHCP Server can be turned off if necessary. Turning off the DHCP server will require you to manually set a Static IP address in each computer on your network. The IP pool is the range of IP addresses set aside for dynamic assignment to the computers on your network. The default is 2-100 (99 computers) if you want to change this number, you can by entering a new starting and ending IP address and clicking on “Apply Changes”. (I haven’t)Local Domain Name
You can set a local domain name (network name) for your local area network, your LAN. You can name your network, your LAN, anything you want such as “MY-NETWORK”.
- I did, back in the beginning, put a name on mine (no spaces, dashes, in the name)
- Remember: Putting your router’s IP (192.168.2.1 or etc.) in your browser, as if it were a web site, probably takes you to your router configuration utility. (?)
It was under LAN Setup >> LAN Settings that I found the place to put the name I wanted on my network.
Step 6
Sept. 20th 2015
Giving your computers (and smartphone, tablet, etc.)
permanent, static, IP addresses
The easiest way is to assign the addresses all in one place: your router.
Do a google search on “How to Set Up Static IP Addresses on {D-link} routers”
Substitute “D-Link” with your router name.
In the D-Link case, D-Link’s own website has a simple “in five easy steps” instruction for it.
1. log in to your router at http://192.168.0.1/
2. click on the “Setup” tab; then click on “Network Settings” on the sidebar.
(under “DHCP Server Settings” section, change the default “DHCP IP Address Range” and then (above) click “Save Settings” if you want something outside their (arbitrary) default range) (100-199)
3. scroll down to the “Add DHCP Reservation” section, check the Enable box and then select your computer’s name (in “computer name \/” drop-down list). … the current IP and MAC address will be filled in.
4. change the IP address (the last/4th set of digits of it) to what you want and click save. do that for all those listed that you want to change then, reset the computer selector list back to “Computer Name” to clear the entries fields and . . .
5. click “Save Settings” (up above). You will be prompted to “click” reboot the router (not your pc etc.) which will reboot the router disconnecting everything and then reconnect with the new addresses.
Can this be done for an IP address that is statically applied from the host internet service, permitting wifi access while hosting a website?
The Internet is outside your LAN and router.
It is their router and their decision.($)