updated 2016-03-03
How to take-upload your visitors webcam photo
How to upload a jpg photo on your website
with your visitors webcam
html5 webcam getUserMedia examples and demo
How to take a jpg webcam photo with html5
One of the really cool things that has come from HTML5 is the ability to access a website visitor’s webcam and upload a snapshot through the browser – with the visitors permission.
example

Remove Adobe Flash!
“If you have Adobe Flash on your computer, and most of you do, you are probably being spied on and Adobe does their best not to let you know or do anything about it. Fundamentally, rich video content is the drug Adobe wants you to get hooked on, but make no mistake, one of the main purposes of Flash is apparently to secretly compromise your security. … Flash has been riddled with exploitable vulnerabilities.” [since 2009]See our page Flash takes over your camera and microphone and writes permanent cookies!
The getUserMedia API
One bad thing about it is that each browser had to rename the API instead of supporting the API as defined – so we are stuck with having an ugly multiple “if” hunting to find the right one.
example 1.
<script>
navigator.getUserMedia = (navigator.getUserMedia ||
                          navigator.webkitGetUserMedia ||
                          navigator.mozGetUserMedia );
if (navigator.getUserMedia)
 {
    navigator.getUserMedia(
       {
          video:true,
          audio:false
       },
       function(stream) { /* do-say something */ },
       function(error) { alert('Something went wrong. (error code ' + error.code + ')');
            return; }
    );
 }
 else {
    alert("Sorry, the browser you are using doesn't support the HTML5 webcam API");
    return;
 }
</script>
from http://html5hub.com/using-the-getusermedia-api-with-the-html5-video-and-canvas-elements/
“Audio/Video capture has been the “Holy Grail” of web development for a long time. For many years we’ve had to rely on browser plugins (Flash or Silverlight) to get the job done.”
“HTML5 to the rescue. It might not be apparent, but the rise of HTML5 has brought a surge of access to device hardware. Geolocation (GPS), the Orientation API (accelerometer), WebGL (GPU), and the Web Audio API (audio hardware) are perfect examples. These features are ridiculously powerful, exposing high level JavaScript APIs that sit on top of the system’s underlying hardware capabilities.”
“getUserMedia() has been supported since Chrome 21, Opera 18, and Firefox 17.” [also Opera Mobile for Android devices]
http://www.html5rocks.com/en/tutorials/getusermedia/intro/
So far, IE and Safari don’t support getUserMedia. – almost all other browsers do.
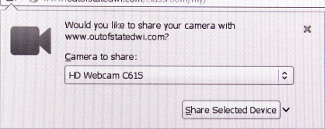


When the webcam is called the user will be asked for permission (as in the 3 images above) letting you Allow (Chrome and android) access to your camera or to “Share Selected Device”(Firefox). This is a very important privacy feature which stops websites from being able to spy on users without their knowledge. [as is being done in Flash!]
example 2.
A Complete example to get a snapshot
and upload it to the server
Pieced together from a variety of google searches and then experimenting till I got it to work.
captures a picture from webcam and submits it in a form.
Part 1. a few CSS styles:
 <style>
.camcontent{
  display: block;
  position: relative;
  overflow: hidden;
  height: 480px;
  margin: auto;
  }
.cambuttons button {
  border-radius: 15px;
  font-size: 18px;
  }
.cambuttons button:hover {
  cursor: pointer;
  border-radius: 15px;
  background: #00dd00 ;    /* green */
  }
 </style>
Part 2. the Javascript and HTML5:
Note: A small google script is used to avoid “reinventing the wheel”.
<script src="//ajax.googleapis.com/ajax/libs/jquery/1.8.3/jquery.min.js"></script>
<script>
        // Put event listeners into place
        window.addEventListener("DOMContentLoaded", function() {
            // Grab elements, create settings, etc.
            var canvas = document.getElementById("canvas"),
                context = canvas.getContext("2d"),
                video = document.getElementById("video"),
                videoObj = { "video": true },
                image_format= "jpeg",
                jpeg_quality= 85,
                errBack = function(error) {
                    console.log("Video capture error: ", error.code);
                };


            // Put video listeners into place
            if(navigator.getUserMedia) { // Standard
                navigator.getUserMedia(videoObj, function(stream) {
                    video.src = stream;
                    video.play();
                    $("#snap").show();
                }, errBack);
            } else if(navigator.webkitGetUserMedia) { // WebKit-prefixed
                navigator.webkitGetUserMedia(videoObj, function(stream){
                    video.src = window.webkitURL.createObjectURL(stream);
                    video.play();
                    $("#snap").show();
                }, errBack);
            } else if(navigator.mozGetUserMedia) { // moz-prefixed
                navigator.mozGetUserMedia(videoObj, function(stream){
                    video.src = window.URL.createObjectURL(stream);
                    video.play();
                    $("#snap").show();
                }, errBack);
            }
                  // video.play();       these 2 lines must be repeated above 3 times
                  // $("#snap").show();  rather than here once, to keep "capture" hidden
                  //                     until after the webcam has been activated.

            // Get-Save Snapshot - image
            document.getElementById("snap").addEventListener("click", function() {
                context.drawImage(video, 0, 0, 640, 480);
                // the fade only works on firefox?
                $("#video").fadeOut("slow");
                $("#canvas").fadeIn("slow");
                $("#snap").hide();
                $("#reset").show();
                $("#upload").show();
            });
            // reset - clear - to Capture New Photo
            document.getElementById("reset").addEventListener("click", function() {
                $("#video").fadeIn("slow");
                $("#canvas").fadeOut("slow");
                $("#snap").show();
                $("#reset").hide();
                $("#upload").hide();
            });
            // Upload image to sever
            document.getElementById("upload").addEventListener("click", function(){
                var dataUrl = canvas.toDataURL("image/jpeg", 0.85);
                $("#uploading").show();
                $.ajax({
                  type: "POST",
                  url: "html5-webcam-save.php",
                  data: {
                     imgBase64: dataUrl,
                     user: "Joe",       *
                     userid: 25         *
                  }
                }).done(function(msg) {
                  console.log("saved");
                  $("#uploading").hide();
                  $("#uploaded").show();
                });
            });
        }, false);

   </script>


<div class="camcontent">
    <video id="video" autoplay></video>
    <canvas id="canvas" width="640" height="480">
</div>
<div class="cambuttons">
    <button id="snap" style="display:none;">  Capture </button>
    <button id="reset" style="display:none;">  Reset  </button>
    <button id="upload" style="display:none;"> Upload </button>
    <br> <span id=uploading style="display:none;"> Uploading has begun . . .  </span>
         <span id=uploaded  style="display:none;"> Success, your photo has been uploaded!
                <a href="javascript:history.go(-1)"> Return </a> </span>
 </div>
Above, there are 2 or 3 lines which you may need to change to fit your situation:
(of course, you can change a lot – especially the css and html)
1. the name of the program ajax calls and sends the image and other data to is named “html5-webcam-save.php” in this example and the example code for it is in “Part 3.” below. Realize that the name of your program is arbitrary and if you write programs using another language (not php), that is your option also.
2. in addition, you can send other information along with the image.
“imgBase64: dataUrl”
is required but the examples *
user: “Joe”,
userid: 25
are not likely useful. You will want to put in variables that identify the person. like for instance:
userid: "<?php echo $USER->id ; ?>"
This php example is one where the visitor/user has logged in to some website program and their user-id is being stored in memory, in a variable “$USER->id”. If it is a number, the quotes are ok but not required, if it contains characters other than numbers, the quotes are required.
Part 3. the “html5-webcam-save.php”
to save the .jpg photo to a folder (ex: images/) using php:
Break up a string on the commas (“explode”), convert (decode) the jpg image, name and save the image.
(and maybe update a user record in your database?)
<?php

$rawData = $_POST['imgBase64'];
$filteredData = explode(',', $rawData);
$unencoded = base64_decode($filteredData[1]);

$datime = date("Y-m-d-H.i.s", time() ) ; # - 3600*7

$userid  = $_POST['userid'] ;

// name & save the image file
$fp = fopen('images/'.$datime.'-'.$userid.'.jpg', 'w');
fwrite($fp, $unencoded);
fclose($fp);

  // next, update or insert a users record
part 4. extra: How to retrieve and view the collection
of photos saved in the folder “images” with php
<?php

    $filelist = opendir('images') ;
    $photos = array();

    while ($campic = readdir($filelist))
        {
        if (strpos($campic, '.jpg') !== false  )
           { $photos[] = $campic; }
        }
    closedir($filelist);
    rsort($photos);  # to display the most recent photos first

    foreach ($photos AS $photo )
        { echo  ' <img width=640 height=480 src="images/'.$photo.'">
                  <br> '.$photo.'<br> <br> <br>' ; }
Can you post the same for asp.net??
Hi, your code is great. I made it and it works perfect on xampp, but when I upload to my server nothing work the html file looks blank in browser, but the code is there. I already incorporate the jquery.min.js and it didn´t work. Can you help me? what is happening?
How do you set up a button event? After clicking it, the webcam then appears
This is great. Thank you.
I was wondering if this could be used to take a picture from the webcam say, every 1/2 sec. I do not want to show the stream on the screen. I am looking for a qr code that someone will put in front of a fixed camera. If we see a QR code we will service their request. I just want this to be on a timer in the background. Is this even possible with a hidden canvas?
Not working at all 09/11/2018.